How to create an effective GitHub project README?
A README file is a guide that contains detailed information on projects developers are working on. In simpler terms, a project README on GitHub is the instruction manual for the project.

Learn how to craft an impactful GitHub project README, with tips on content, structure, and examples for inspiration.
Did you know? Github houses over 200 million repositories. So what can you do as a developer to make your project stand out? The answer is the README file associated with it.
A README file is a guide that contains detailed information on projects developers are working on. In simpler terms, a project README on GitHub is the instruction manual for the project. It provides various important details such as information about its usage, installation, and application.
A README file is crucial for developers and users, offering insight into a project's purpose, motivation, problem-solving approach, and technologies used. It provides setup instructions, making a project user-friendly. A well-crafted README boosts a project's appeal on platforms like GitHub, fostering collaboration and aiding codebase comprehension for success.
README files are the easiest, most interesting, and one of the best ways (if not the best way) to make a profile more attractive, interesting, and organised.
A well-written GitHub project README serves two purposes for a developer-
- It illustrates the seriousness and meticulousness of the developer regarding his own projects.
- If the README is attractive and impressive enough, it may compel your profile visitors to get in touch regarding any future collaboration.
Apart from projects, README files are also created by developers to give details about themselves. A GitHub profile README file is a guide that gives a detailed description of a developer and appears at the top of a developer’s GitHub profile. Read more about it here.

An excellent example of an effective project README is Alicia Sykes’ project README. In it, she has expertly used React.js to explain cybersecurity basics.
Alicia’s README clearly states that the project is meant for an audience that may not be well-versed in technology. It also provides a slideshow that describes the project’s essential features and its method of delivery. Towards the end, the README file describes how the project can be edited and deployed.
Furthermore, it includes a concise troubleshooting section addressing common issues users may encounter during installation or usage. Lastly, Alicia encourages users to provide feedback and report any bugs, fostering an open and collaborative environment for project improvement.
Now that we’ve covered an example of a good project README, let’s try to understand the importance of a README and how to make it stand out.
What is the purpose of a README?
A project README can serve multiple purposes. Here are a few possible use-cases:
- Explanation of the project: A README file describes the purpose of the repository and explains what the code is all about, how to compile/use it, etc. Project READMEs provide an introduction to the project and the files associated with it thus saving the visitors the hassle of reading the developer’s mind to understand the project.
- Stand out among a sea of developers: A well-structured README shows developers’ seriousness and meticulous approach to their projects. It gives an idea about how well they maintain project documentation, their everyday activity, and the standards they maintain while writing codes.
- Manage Project expectations: One of the most essential pieces of information that a project README can contain is the contribution guidelines and a code of conduct. These can prove very beneficial in clearly laying down the framework for other developers in terms of the ways they contribute to the project and the expectations from them.
- Documentation and Instructions: Project READMEs frequently encompass documentation and instructions detailing how to utilise the project, set up essential dependencies, and execute it. This instructional content proves highly beneficial for fellow developers seeking insight into project usage and participation.Facilitate Cooperation: A README additionally promotes collaboration by offering insights into how individuals can contribute to the project, whether by rectifying issues, introducing new features, or engaging in various forms of involvement. This fosters the establishment of a cooperative and open-source development ecosystem.
What should I put on my GitHub project README?
It is essential to remember that a piece of code can be pulled up from developers’ repositories at any moment by other developers. Since it would be the first-time they take a look at the code, they would need something to get a good hang of it, and this is where a project README could come in handy.
A project README is a valuable entry point for developers exploring your code. It provides them with essential context and guidance, making it easier for them to understand and contribute to your project effectively. Furthermore, a well-crafted README enhances collaboration and encourages the community to engage with your codebase.
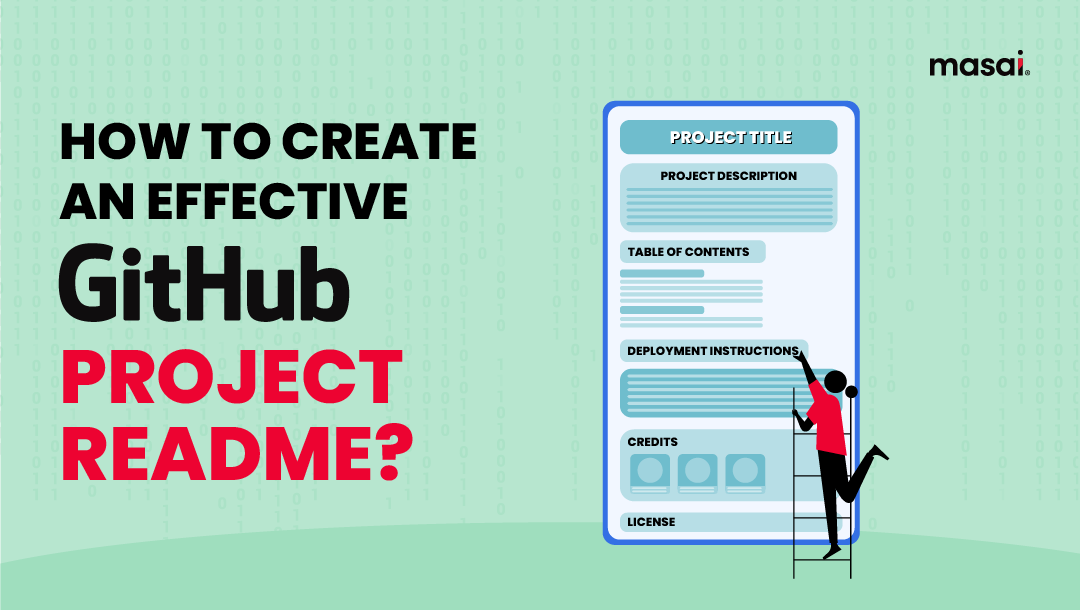
Thus in order to make sure a project README is written in a manner that is organised and understandable to the reader (other developers in this case), here is a list of a few things that can be included-
- Project’s Title: This is the segment of the project README that appears at the top. It includes the name of the project and gives a brief description that assists people in understanding the project's main goal and objective. A compelling project title can draw users' attention and provide a clear initial impression of the project. It should be concise yet descriptive, conveying the essence of the project in just a few words. Additionally, the project title often serves as the primary identifier for the project across various platforms and repositories.

- Project Description: The description section of a project README is a critical component of the project. A well-written project description is one that helps developers stand out and quickly demonstrate the project in an efficient manner to other developers and maybe even recruiters. A project description that thoroughly explains the application of the project, the technologies used, various hurdles encountered during its development and the potential future updates that might be incorporated into it is the epitome of all project READMEs and can become a major differentiator between a good and bad GitHub repository.

- Table of contents: It is generally advised to provide a table of contents for project READMEs that become very long but it would be much recommended to provide a table of contents even for smaller READMEs as this would create an impression of a serious developer in the eyes of the visitor. When creating a table of contents, remember that GitHub automatically adds IDs to headings, making it easier to navigate through your README. Including a table of contents makes it effortless for users to find specific sections of interest and enhances the overall readability of your project's documentation.

- Deployment instructions: Since there might be other developers who want to run a particular piece of code available inside someone else’s repository on their local system, deployment instruction is an important segment that must be included in a README project. It is recommended that developers provide a step-by-step guide for deploying code on a local system. Providing comprehensive deployment guidelines in your README is crucial to facilitate seamless code execution and testing on individual developers' local setups. These instructions serve as a roadmap, ensuring a streamlined and productive development experience for all stakeholders.

- Credits: In case more than one person contributed to the project, it is very important to make a list of the people who worked on the project. It is recommended to include links to their GitHub profiles and their social media handles. In the case of knowledge gathered from different resources, it would be an added bonus if specific links to them are added as well. This helps portray the humble and grateful characteristics of developers.

- License: This generally appears at the bottom of a project README. There are different kinds of licenses associated with a project which determines the kind of contributions a project gets. Hence, a quick rundown of the various licenses associated with a project can help other developers get an idea regarding the ways they can utilise the project. Apart from presenting a license overview, it is crucial to contemplate the ramifications of the selected license on your project. The selection of a license can substantially influence how individuals can employ, alter, and disseminate your code.

The above list gives a brief overview of the bare necessities of a project README. In addition to this developers can add badges that provide statistical details (forks, commits, contributors, stars, issues, the number of licenses, etc) of a particular project in addition to instructions for contributions.
How to create a GitHub project README?
Follow these simple steps to create a GitHub project README-
Step #1: Log into GitHub and go to your profile
Step #2: In the upper-right corner of any page, use the drop-down menu, and select New repository.

Step #3: Type a short, memorable name for your repository. For example, "hello-world".

Step #4: Optionally, add a description of your repository. For example, "My first repository on GitHub."

Step #5: Choose repository visibility.

Step #6: Select Initialize this repository with a README.

Step #7: Click Create repository.

Examples of effective GitHub project READMEs
Following is a list of 5 awesome GitHub project READMEs that caught our attention and might serve as a source of inspiration for other developers while creating their project READMEs-
- Profile: Andrey Sitnik
Repository name: size-limit
Andrey’s “size-limit” is a JavaScript project budgeting tool. It takes into account every commit on CI, makes an estimate around the cost of development of the project, and returns an error if the cost exceeds the stipulated limit.

Andrey’s project README is on top of this list mainly because of four reasons- project logo, clear description, screenshot, and step-by-step installing instructions. It introduces the visitors to the project from the moment they open the README file and then follows it up with a bulleted list of its applications.
Andrey then puts run-time screenshots to great effect to give an idea of the output they can expect when they run the code. The rest of the README is all text that explains in detail its libraries, licenses, and the way it can be applied in various languages, reports, configurations, etc.
2. Profile: Amit Merchant
Repository name: electron-markdownify
This project by Amit Merchant on GitHub helps end-users view the real-time output of any project they might be working on the cross-platform web development application, Electron.

Amit Merchant’s “Mardownify” README is interesting solely because of its minimalistic description. A GIF that demonstrates the application of the project is captivating enough to make the visitors stick to the README file and scroll further down.
Amit’s README lives up to the description of the project and provides concise instructions about its features, method of usage, ways to download, licenses, etc.
3. Profile: Aregtech
Repository name: areg-sdk
AREG-SDK is a communication engine that enables seamless interaction of devices using the power of distributed computing as well as the Internet of Things(IoT).

This particular repository serves as the ideal framework for a simple project README. It starts with a very crisp creative that strikes a human chord with the visitors followed by a quick rundown of project stats.
Later sections of the README adhere to a structure synonymous with school projects. It has an introduction, a table of contents, the motivation behind the project, use cases, license details, and every other small detail that matters.
It would be very safe to call this README an instruction manual as it is detailed enough to solve any problem a developer would encounter while using it.
4. Profile: Cole Gawin
Repository name: well_app
Cole Gawin’s “well” application helps its end-users boost their daytime productivity by suggesting structured, guided activities that include meditation, journaling, exercises, etc.

This project README is the go-to README file for app development repositories. Cole has intelligently used a thumbnail that serves the purpose of grabbing the attention of the visitor and striking an emotional chord with them.
Once Cole grabs the attention of the visitor he then dives deep into explaining the technicalities. Further descriptive sections, each of which has a title with a yellow emoji fulfill the dual purpose of explaining the app in detail as well as attaching a particular colour (yellow) with the app which may further help in its marketing.
5. Profile: Harsh Vijay
Repository: WebApp
Harsh’s “webapp” displays the history of stock growth over a specified time period. It can predict the growth of stocks based on stock performance charts over any time period.

With extensive use of screenshots, Harsh’s README clearly demonstrates the application of the project to the visitor and makes their life easier.
Harsh then follows this up with segments that explain in simple language the method of its installation as well as its usage. It also includes an examples section with common uses and a mobile demo section.
What is even better is his quest to make his project better which becomes very evident with the various external links at the end that visitors can refer to whenever they feel the need to contribute to his code. Lastly, Harsh acknowledges the contribution of other developers to his code by doing the due diligence of providing a link to their profile, thus showing his humility.
A project README helps developers take up a not-so-serious approach toward coding helping them reap personal as well as professional benefits by channelising their knowledge, creativity, and seriousness towards their code.
We hope this piece of content helps adds value to the life of developers who are looking forward to amaze their visitors with a perfect blend of their knowledge and creativity.
FAQs
What is the purpose of a GitHub project README?
A GitHub project README serves as an instruction manual for a project, providing crucial information on usage, installation, and application. It helps developers stand out, manage project expectations, and showcase their seriousness and meticulousness.
What should I include in my GitHub project README?
The project title, description, table of contents, deployment instructions, credits, and license information are key elements to include. Additional details can vary depending on the project's complexity.